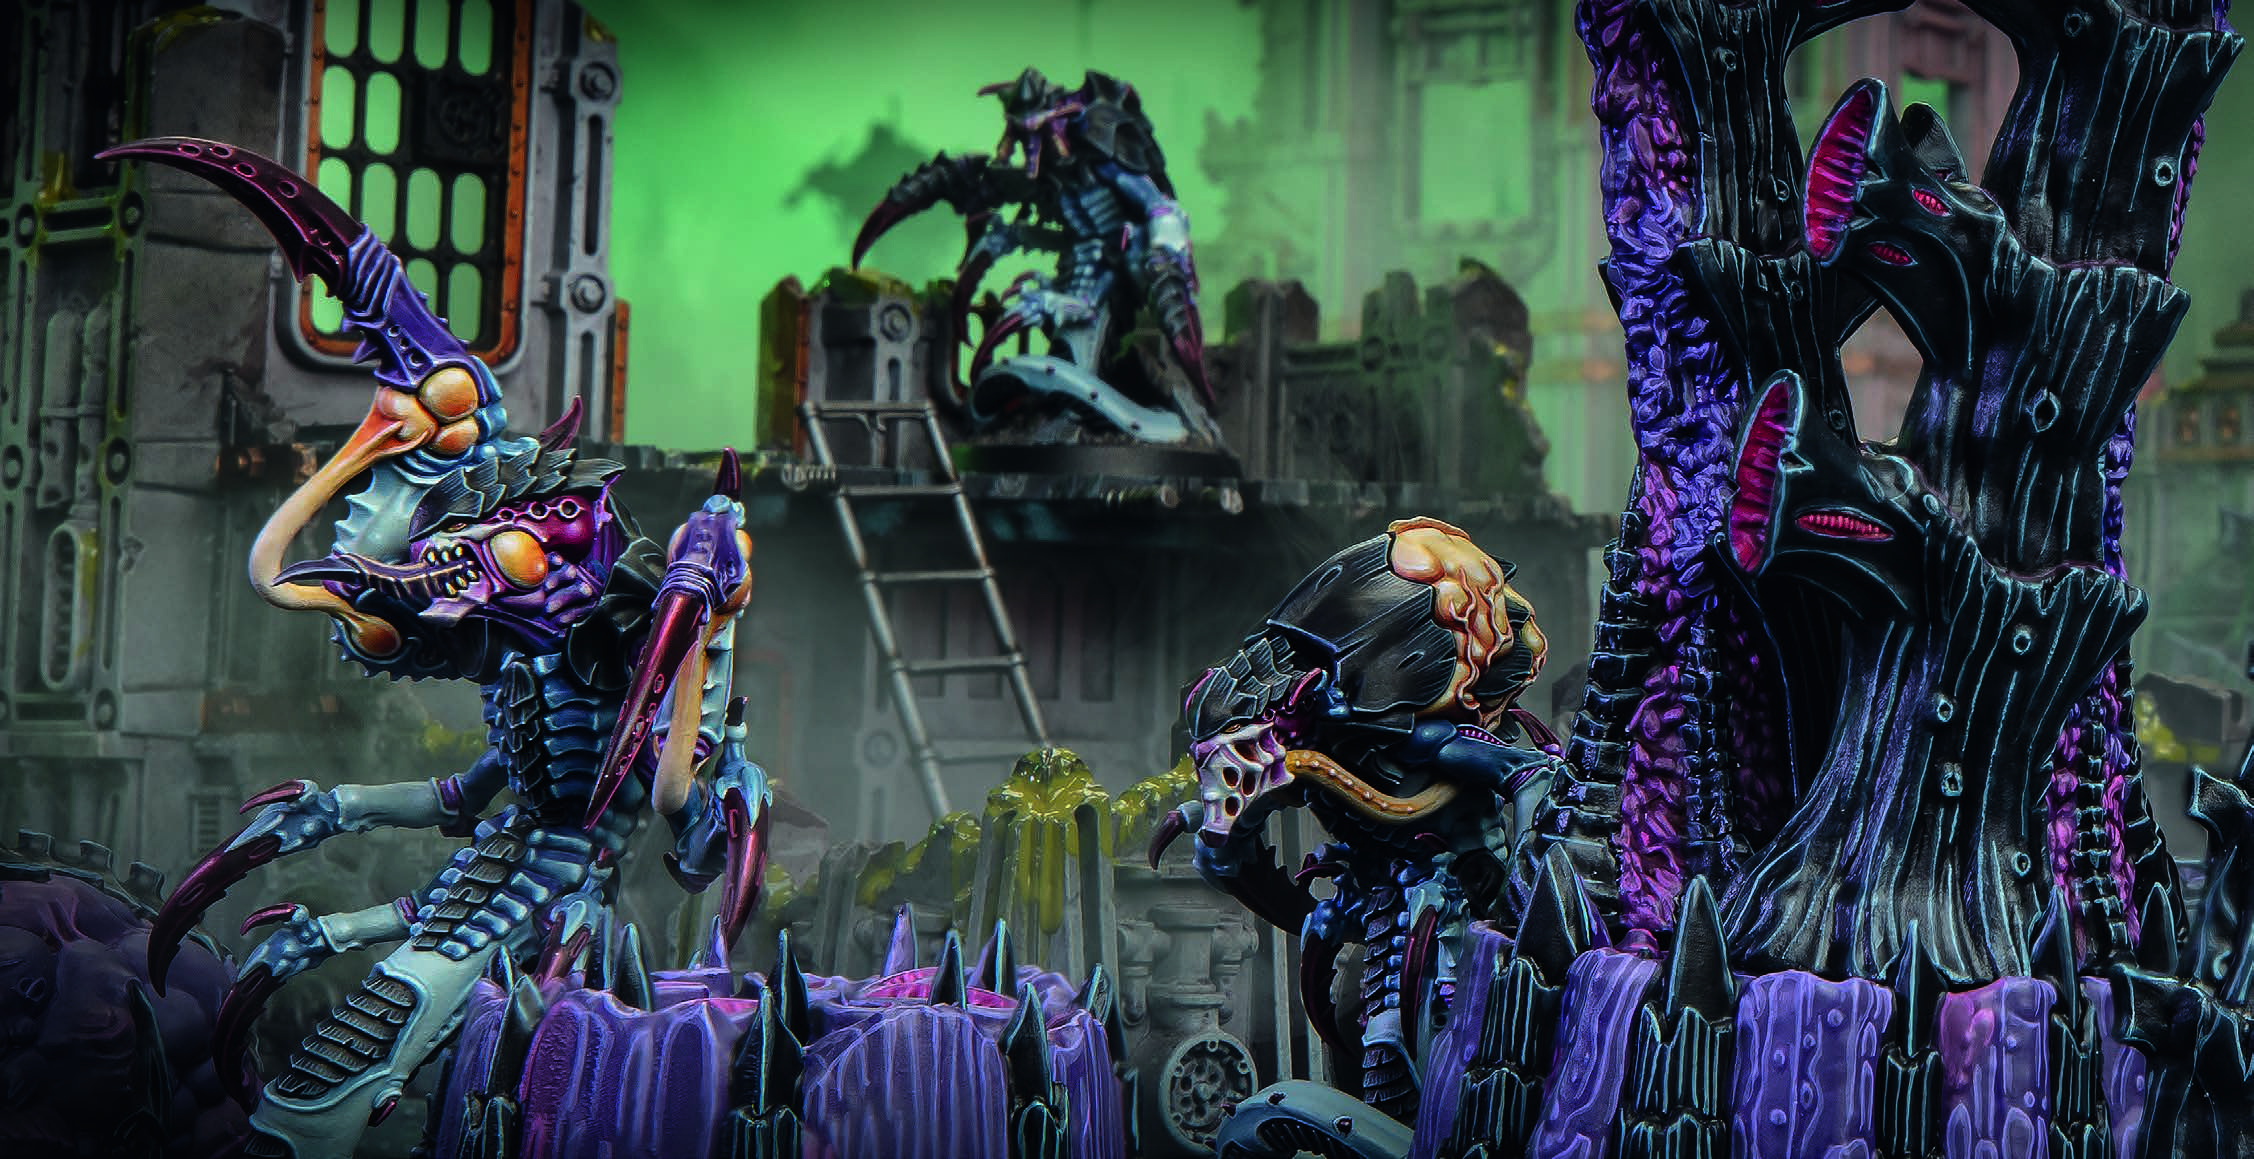
Tyranids
Raveners
Seek And Destroy/Infiltration
Ravener kill teams are hyperadapted to such an extent that they are able to overcome all manner of a prey species’ defences. Driven by alien synaptic imperatives, Raveners burrow with horrific speed to strike at prey from vulnerable angles, before using razor-sharp talons, chitinous claws and virulent biotoxins to enact the Hive Mind’s will.
Faction Rules
Burrow
When setting up a RAVENER kill team before the battle, your first two operatives must be set up as normal.
Each other friendly RAVENER operative thereafter can be set up underground: place it to one side instead of in the killzone.
In the Firefight phase, friendly RAVENER operatives set up underground are activated and can counteract as normal. Whenever a friendly RAVENER operative is underground, it cannot perform any actions other than Burrow.
At the end of the battle, each friendly RAVENER operative that’s underground is incapacitated.
Friendly RAVENER operatives can perform the following action:
BURROW (1 AP):
If this operative is underground, set it up on your TUNNEL in a location it can be placed (it’s no longer underground, and it can be set up within control range of enemy operatives).
Until the end of the activation/counteraction, subtract 2" from its Move stat.
Alternatively, instead of resolving the above effect, if this operative is in the killzone and on your TUNNEL, remove it from the killzone: it’s now underground.
An operative cannot perform this action while carrying a marker, or if it isn’t either underground or on your TUNNEL.
Predatory Instincts
During each friendly RAVENER operative’s activation, it can perform two Fight actions.
Each friendly RAVENER operative can counteract regardless of its order. Whenever it does:
- You can change its order first, or change its order instead of performing an action (for the latter, still treat it as having counteracted this turning point).
- During that counteraction, if it doesn’t perform a mission action it can perform a free Burrow action.
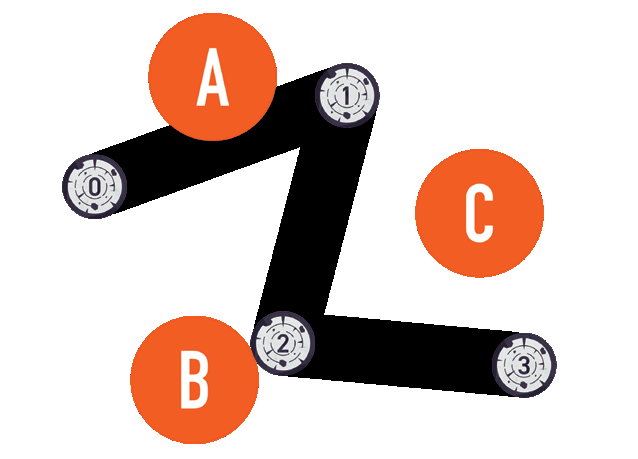
Tunnel
At the end of the Set Up Operatives step, place your Tunnel marker numbered `0` on the killzone floor, wholly within your drop zone and touching your killzone edge.
As a STRATEGIC GAMBIT in the first four turning points, you can place your next numbered Tunnel marker on the killzone
floor wholly within 5" of your preceding Tunnel marker.
This means that, as the battle progresses, you can have a series of sequentially numbered Tunnel markers (0, 1, 2, 3 and 4).
Once you have placed five Tunnel markers, don’t place any more (i.e. if your battle lasts more than four turning points).
Your Tunnel markers and the area between your sequentially numbered markers (i.e. between 0 and 1, 1 and 2, etc.), create your TUNNEL.
In a killzone that uses the hazardous areas rules (e.g. Killzone: Bheta Decima), for the purposes of the Restricted Movement rule, parts of a Tunnel marker that are touching a hazardous area are treated as a hazardous area.
In a killzone that uses the close quarters rules (e.g. Killzone: Tomb World), your TUNNEL and the distance between your Tunnel markers can be measured through Wall terrain.
Operatives
Strategic Ploys
Whenever a friendly RAVENER operative is fighting:
If it’s performed the Burrow action during that activation/counteraction, its melee weapons have the Balanced weapon rule.
If it’s on your TUNNEL, its melee weapons have the Ceaseless weapon rule.
Whenever a friendly RAVENER operative is on your TUNNEL it’s in cover, unless it’s within 2" of the active operative. Treat this as cover provided by Light terrain (therefore it’s affected by rules that prevent this, e.g. Seek Light and Vantage terrain).
Whenever an operative is shooting a friendly RAVENER operative:
f that friendly operative has performed the Burrow action during that turning point, you can re-roll one of your defence dice.
f that friendly operative is on your TUNNEL, you can re-roll any of your defence dice.
Select one friendly RAVENER operative in the killzone. That friendly operative can immediately perform a free Burrow action. If it’s within 2" of your TUNNEL, it can immediately perform a free Fall Back or Reposition action before it does so.
Firefight Ploys
Use this firefight ploy when a friendly RAVENER operative performs the Burrow action. Before that operative is removed from the killzone, or after setting it up on your TUNNEL, inflict D3+1 damage on each enemy operative within its control range (roll separately for each).
You cannot use this ploy in the Strategy phase, or during a FELLTALON operative’s activation or counteraction if it performs the Toxic Lunge action (and vice versa).
Use this firefight ploy when a friendly RAVENER operative is incapacitated. Before that operative is removed from the killzone, inflict D3 damage on each enemy operative within its control range (roll separately for each).
If that friendly operative is a VENOMSPITTER that’s currently benefitting from the effects of its Distend Dorsal Sac action, inflict 2D3 damage instead.
Use this firefight ploy during a friendly RAVENER operative’s activation or counteraction, before or after it performs an action. During that activation/ counteraction, that operative can:
Perform the Fall Back action for 1 less AP.
Perform the Charge action while within control range of an enemy operative, and can leave that operative’s control range to do so (but then normal requirements for that move apply).
Use this firefight ploy when an enemy operative is performing the Fight action and selects a friendly RAVENER operative on your TUNNEL to fight against.
In the Resolve Attack Dice step of that sequence, you resolve the first attack dice (i.e. defender instead of attacker).
Equipment
Chromatospore Camouflage
Whenever an operative is shooting a friendly RAVENER operative, if you can retain any cover saves, you can retain one additional cover save. This isn’t cumulative with improved cover saves from Vantage terrain.
Acid Blood
Whenever a friendly RAVENER operative is fighting or retaliating, whenever an attack dice inflicts damage on it, roll one D6: on a 5+, inflict 1 damage on the enemy operative in that sequence.
Metamorphic Flesh
Whenever a friendly RAVENER operative is activated, it regains up to D3 lost wounds.
Heightened Senses
Once per battle, after rolling off to decide initiative, if a friendly RAVENER operative is underground and an enemy operative is within 5" of your TUNNEL, you can re-roll your dice.
Ammo Cache (x1)
Before the battle, you can set up one of your Ammo Cache markers wholly within your territory. Friendly operatives can perform the following mission action during the battle:
One of your Ammo Cache markers the active operative controls is used during this turning point.
Until the start of the next turning point, whenever this operative is shooting with a weapon from its datacard, you can re-roll one of your attack dice.
An operative cannot perform this action while within control range of an enemy operative, if that marker is not yours, or if that marker has been used this turning point.
Razor Wire (x1)
Razor wire is Exposed and Obstructing terrain. Before the battle, you can set it up wholly within your territory, on the killzone floor and more than 2" from other equipment terrain features, access points, and Accessible terrain.
Obstructing: Whenever an operative would cross over this terrain feature within 1" of it, treat the distance as an additional 1".
Comms Device (x1)
Before the battle, you can set up one of your Comms Device markers wholly within your territory.
While a friendly operative controls this marker, add 3" to the distance requirements of its SUPPORT rules that refer to friendly operatives
(e.g. ‘select one friendly operative within 6"’ would be 9" instead).
Note that you cannot benefit from your opponent's Comms Device markers.
Mines (x1)
Before the battle, you can set up one of your Mines markers wholly within your territory and more than 2" from other markers, access points, and Accessible terrain.
The first time that marker is within an operative's control range, remove that marker and inflict D3+3 damage on that operative.
Light Barricades (x2)
Light barricades are Light terrain, except the feet, which are Insignificant and Exposed. Before the battle, you can set up any of them wholly within your territory, on the killzone floor and more than 2" from other equipment terrain features, access points, and Accessible terrain.
Heavy Barricade (x1)
A heavy barricade is Heavy terrain. Before the battle, you can set it up wholly within 4" of your drop zone, on the killzone floor and more than 2" from other equipment terrain features, access points, and Accessible terrain.
Ladders (x2)
Ladders are Insignificant and Exposed terrain. Before the battle, you can set up any of them as follows:
- Wholly within your territory.
- Upright against terrain that’s at least 2" tall.
- More than 2" from other equipment terrain features.
- More than 1" from doors and access points.
Once per action, whenever an operative is climbing the terrain feature a ladder is placed against, treat the vertical distance as 1" if the ladder is within that operative’s control range during that entire climb.
Portable Barricade (x1)
A portable barricade is Light, Protective and Portable terrain, except the feet which are Insignificant and Exposed.
Before the battle, you can set it up wholly within your territory, on the killzone floor and more than 2" from other equipment terrain features, access points, and Accessible terrain.
Protective: While an operative is in cover from this terrain feature, improve its Save stat by 1 (to a maximum of 2+).
Portable: This terrain feature only provides cover while an operative is connected to it and if the shield is intervening (ignore its feet).
Operatives connected to the inside of it can perform the following unique action during the battle:
The same as the Reposition action, except the active operative can move no more than its Move stat minus 2" and cannot climb, drop, jump, or use any killteam's rules that remove it and set it back up again (e.gh. HEARTHKYN SALVAGER Fly, MANDRAKE Shadow Passage).
Before this operative moves, remove the portable barricade it is connected to. After it moves, set up the portable barricade so it is connected again, but the portable barricade cannot be set up within 2" of
other equipment terrain features, access points or Accessible terrain. If this is not possible, the portable barricade is not set up again.
This action is treated as a Reposition action. An operative cannot perform this action while within control range of an enemy operative, or in the same activation in which it performed the Fall Back or Charge action.
Utility Grenade - Smoke (x1/2)
When you select this equipment, select two utility grenades (2 smoke, 2 stun, or 1 smoke and 1 stun).
Each selection is a unique action your operatives can perform, but your kill team can only perform that action a total number of times during the battle equal to your selection.
Place one of your Smoke Grenade markers within 6" of this operative. It must be visible to this operative,
or on Vantage terrain of a terrain feature that is visible to this operative. The marker creates an area of smoke 1" horizontally and unlimited height vertically from (but not below) it.
While an operative is wholly within an area of smoke, it is obscured to operatives more than 2" from it, and vice versa.
In addition, whenever an operative is shooting an enemy operative wholly within an area of smoke, weapons with the Piercing 2 or Piercing Crits 2 weapon rule have the Piercing 1 or Piercing Crits 1 weapon rule (respectively) instead, unless they’re within 2" of each other.
In the Ready step of the next Strategy phase, roll one D3. Remove that Smoke Grenade marker after a number of activations equal to that D3 have been completed
or at the end of the turning point (whichever comes first).
An operative cannot perform this action while within control range of an enemy operative, or if you have reached the total number of times your kill team can perform it.
Utility Grenade - Stun (x1/2)
When you select this equipment, select two utility grenades (2 smoke, 2 stun, or 1 smoke and 1 stun).
Each selection is a unique action your operatives can perform, but your kill team can only perform that action a total number of times during the battle equal to your selection.
Select one enemy operative visible to and within 6" of this operative. That operative and each other operative within 1" of it takes a stun test. For an operative to take a stun test, roll one D6: on a 3+, subtract 1 from its APL stat until the end of its next activation.
An operative cannot perform this action while within control range of an enemy operative, or if you have reached the total number of times your kill team can perform it.
Explosive Grenade - Frag (x1/2)
When you select this equipment, select two explosive grenades (2 frag, 2 krak, or 1 frag and 1 krak).
| Weapon | ATK | HIT | DMG | Special |
|---|---|---|---|---|
| Frag Grenade | 4 | 4+ | 2/4 | Rng 6", Blast 2", Saturate |
Explosive Grenade - Krak (x1/2)
When you select this equipment, select two explosive grenades (2 frag, 2 krak, or 1 frag and 1 krak).
| Weapon | ATK | HIT | DMG | Special |
|---|---|---|---|---|
| Krak Grenade | 4 | 4+ | 4/5 | Rng 6", Piercing 1, Saturate |
Breaching Charge
Once per battle, when a friendly operative performs the Breach action, you can use this rule. If you do, that operative can perform that action for 1 less AP (to a minimum of 1AP) as though it had the word "breach marker" on its datacard.
Building Your Roster
A RAVENERS KillTeam  is composed of:

- 1 RAVENER PRIME
- 4 RAVENER operatives selected from the following list:
  - FELLTALON
  - TREMORSCYTHE
  - VENOMSPITTER
  - WARRIOR
  - WRECKER

Other than WARRIOR operatives, your KillTeam can only include each operative on this list once.